
PowerShell 教程
 小虾米
小虾米PowerShell 教程
基础资源
视频列表 文档列表 演示代码 Github 地址 PowerShell Gallery - 用户创作中心
基础操作
-
和 Linux 一样,敲完命令按 Tab,会有命令提示,在 powershell 中,Tab 键还能把命令中的小写转成大写
-
参数提示:敲完命令,按完
-之后按 Tab,可以提示参数,多按几次,还能跳到别的参数,Shift+Tab 跳回去 -
Update-Help,我本地的$PSUICulture是zh-CN,直接运行Update-Help的话会默认下载中文的 help 信息,但是很多 module 都没有中文的 help 信息,所以实际上啥都下不下来,所以为了好下载,运行Update-Help -UICulture en-US,Get-Help不会根据 UICulture 来显示,有啥显示啥
基础概念
-
@: arrys、hash table、splatting、here-string(可以理解为多行字符串)
-
Module 实际上就是将脚本块(主要是方法和变量)定义成成一个功能包,有点像 JavaScript 的 js 插件,比如轮播图插件。
lesson1 基础命令
三个基础命令
-
PowerShell commands are referred to as cmdlets,it follows a verb noun structure,这个结构可以帮助我们记忆和推断命令
-
PowerShell 管道里传输的是对象
-
三个必背命令
-
Get-Command,获取命令,例子:
Get-Command *task*;Get-Command *process*;Get-Command -module moduleName -
Get-Help,先 Update-Help(需要 run as a administrator),例子,
Get-Help Stop-Process;Get-Help Stop-Process -Examples,还可以Get-Help Learn-Func -ShowWindow,这样会打开一个单独的窗口显示完成的 help 信息(仅限 Windows)。有了这两个命令,基本上就可以自己找命令自己学命令了
-
Get-Member,查看命令返回的是什么对象,例子,
Get-Date| Get-Member;Get-Date | Format-List, -
Find-Module,查找模块,Install-Module 下载模块,例子,
Find-Module -Name PowerShellGet | Install-Module
-
这几个命令真的是基础中的基础,非常棒!!!
lesson2 Pipeline
Pipeline |
-
定义:It’s just a pipeline operator(
|) that moves data from one command to another -
注意点:
-
不是所有的 cmdlet 都支持 pipeline input,用之前用
Get-Help查一下 -
|前后的 cmdlet 传递的 Object 的类型要相同,否则后者会无法使用 pipeline 中的值
-
-
$PSItem,PSItem contains the current object in the pipeline。这个变量保存着当前 pipeline 中变量,可以简写为$_,例子,1,2,3| ForEach-Object{$PSItem};1,2,3| ForEach-Object{$_} -
pipeline 首要的作用是让你可以处理上一个 cmdlet 返回的信息,
|Format-Table,|Format-List *,|ForEach-Object,|Select-Object Name,CPU,|Sort-Object CPU,|Where-Object{$_.CPU -gt 100},Get-ChildItem -Path C:\Users\LiangKang\Desktop\ -Recurse|Where-Object{$_.length -gt 1kb},Where-Object 非常强大,跟 sql 里的 where 语句一样,注意,这些条件都可以组合,Measure-Object对结果进行统计,-
parameters,参数,主要就是通过
Tab和Shift+Tab快捷键切换,有一个很有意思的参数, -WhatIf 注释是 Shows what would happen if the cmdlet runs. The cmdlet is not run,看看这个 cmdlet 能做什么,这个参数不是所有命令都有,get-开头的可能都没有 -
如何记忆和区别这几个 Verb-Object 的 cmdlet 呢,很简单,foreach 进行的是迭代,select 进行的是列选择,sort 进行的是排序,where 进行的是值筛选。我甚至可以举一反三,肯定有 group 操作,最后一查还真有
group-object,eg:Get-Process|Group-Object -Property Name -NoElement。format-Noun 格式的 cmdlet 就更好记了,格式成列表就是 list,格式成表格就是 table
-
-
因为 Pipeline 中传递的是对象,所以我们可以用
(exp).property的格式来获取传递对象的属性值,如果对象是数组或者 list,还可以直接(exp)[index]这样操作。
lesson3 History
PowerShell History and Current State(历史课)
-
默纳德宣言,介绍了 PowerShell 的早期愿景,非常值得一看,我还没看。
-
$PSVersionTable查看当前 Powershell 版本信息,同时可以查看当前操作系统是 Windows 平台还是 Linux 平台,具体脚本去第 10 课笔记查看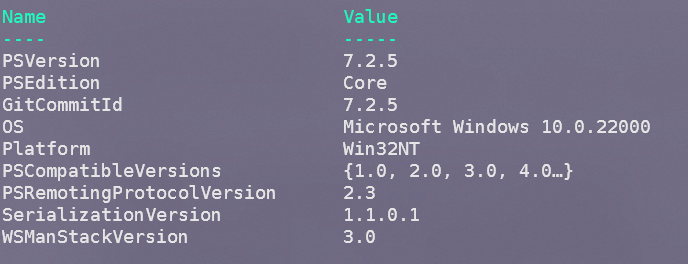
-
PowerShell6(PowerShell)和 PowerShell5(Windows PowerShell)差别很大,从 PowerShell6 开始开源和跨平台,跨平台是最骚的,这样你就可以只学习一种脚本语言,然后在 Windows、Linux 或者 Mac OS 使用,
-
另外要注意,PowerShell6 并不是为了提升 PowerShell 在 Windows 上的处理能力,而是为了开源和跨平台,这个过程中肯定会有一些功能被去掉,所以,PowerShell6 的 cmdlet 数量比 PowerShell5 要少,Linux 版本的更少,不过到了现在的 PowerShell7,这一情况好多了
-
在 Linux 和 MacOS 上,PowerShell6 就是你能用到的最低版本,不存在兼容问题,在 Windows 上,最好使用 PowerShell6 及以上版本,6 相比于 5 有更多的性能提升,特别是 web 命令,Invoke-WebRequest、Invoke-RestMethod有显著提升,我得试试到底有啥提升,后续的升级也不会在 Windows PowerShell 进行,而是会在 PowerShell 中进行,所以一定要使用 PowerShell6 及以上版本。
-
lesson4 准备开发
Getting setup for PowerShell Development PowerShell 开发准备
-
PowerShell ISE 很老了,不支持 5.1 以上的版本的 PoweShell,也不能跨平台,换 VSCode
-
使用 VSCode 开发 PowerShell 的时候,注意一定要手动指定 PowerShell 地址,一般是,C:\Program Files\PowerShell\7\pwsh.exe,如果不指定,默认使用的是 Windows PowerShell,与 PowerShell 相关的推荐配置
-
function 名中的动词(verb-noun structure)只能是特定的一些动词,参考Approved Verbs for PowerShell Commands - PowerShell | Microsoft Docs
-
下载插件 Install-Module PSScriptAnalyzer
-
VSCode 相关
- 直接点击右上角的
▶即可调试脚本,非常方便
- 直接点击右上角的
lesson5 变量
PowerShell Variables PowerShell 变量
-
变量以
$开头,$num='1212',cmdlet 返回的值可以直接放到一个变量中,之前学习 Pipeline 的时候,那些可以放进 pipeline 的值都可以放到 cmdlet 中 -
在 VSCode 中,不需要选中某一行,只需要把鼠标放到某一行,然后按 F8,VSCode 就会运行这一行,也就是说鼠标放到这一行就已经是选中这一行了。这一行只有一个变量的话就会直接打印出变量的内容,这是因为 Power Shell 默认调用了 Write-Output,这个后文会提到。
-
PowerShell is not a strongly typed language. PowerShell 不是强类型语言。非强类型语言的意思是,变量声明的时候不需要指定类型,有承接任何类型的值的能力,其类型由其承接的值决定。当然你也可以手动指定类型,比如
[int]$num = 12,类型之间也可以转换,使用Get-Member方法可以知道类型内部的转换方法,可以通过这些转换方法转换类型,
然后调用,
$str = $myVar.ToString()转换类型Boolean 类型变量貌似只有两个:
$True``$False,这一点跟 Java 是一样的 -
引号
''会直接将他承接的字符串直接显示出来,而""双引号则会对字符串进行转义 (escape),如果其中包含运算符,则会将运算之后的结果显示出来,$abc="test:$(1+2)",其中"$(1+2)"的意思是,我希望这个表达式能成为一个变量,这样,这个表达式会返回最终的值,所以,双引号中可以包含变量以显示动态信息,用处很大。
Write-Host 专门用户输出自定义信息,可以自定义颜色,非常牛逼
Write-Host "Red on white text." -ForegroundColor red -BackgroundColor white,单引号和双引号的区别在 Write-Host 中也成立Write-Host '$abc'直接输出$abc,但是Write-Host "$abc"输出变量内容,所以,单引号和双引号的这个特性应该是全局特性变量
$abc在单引号和双引号中的颜色也不一样,代表不同的意思 -
保留的变量
-
constant variable,常量,默认变量,用于 PowerShell 内部使用,不可更改,仅可读,
Get-Variable会显示出当前 session 中的所有变量,默认就是一些常量,后期手动命名的变量也会显示在其中,常量中有一些值得关注的变量如下:变量名 值 HOME C:\Users\LiangKang PSHOME C:\Program Files\PowerShell\7 Host System.Management.Automation.Internal.Host.InternalHost OutputEncoding System.Text.UTF8Encoding profile C:\Users\LiangKang\Documents\PowerShell\Microsoft.VSCode_profile.ps1 -
environment variable,环境变量,通过
Get-ChildItem env:获取当前环境也就是当前电脑中的环境变量,在打完env:之后,所有环境变量都会出现在智能补全的弹框中,真的是牛逼啊。太方便了。在 PowerShell 中调用环境变量需要在$和变量名之间添加env:比如$env:JAVA_HOME其中,有一个环境变量很好用,就是
$env:HTTP_PROXY,用于设置Powershell的网络代理,我们可以在当前窗口运行$env:HTTP_PROXY="http://127.0.0.1:1080"来临时设置代理地址,也可以直接跑到系统设置中直接新建一个名为HTTP_PROXY值为http://127.0.0.1:1080的环境变量来永久设置代理可通过在powershell中运行
curl www.google.com -I来测试是否设置成功,不要用ping似乎用的是ICMP协议,不走代理
-
-
学到这里,我们已经可以开始写脚本了。综合例子
Read-Host: Reads a line of input from the console eg:$Age = Read-Host "Please enter your age"Write-Host: Writes customized output to a host eg:Write-Host "Red on white text." -ForegroundColor red -BackgroundColor white这两个方法是和 console 交互的重要方法 例子:1 2 3 4 5# 计算两数之和 cls [int]$num0 = Read-Host "请输入参数:" [int]$num1 = Read-Host "请输入第二个参数:" Write-Host "两数之和为:$($num0+$num1)"试试官方例子,
Get-ChildItem:Gets the items and child items in one or more specified locations,官方文档,官方说不会展示空文件夹,我试了下明明会展示。1 2 3 4 5 6 7# 获取指定目录下大小超过 1G 的文件数量 cls $folderPath = Read-Host 'please input the path' $files = Get-ChildItem -Path $folderPath -Recurse $bigFiles = $files|Where-Object {$_.Length -gt 1GB} $bigFilesCount = $bigFiles|Measure-Object|Select-Object -ExpandProperty Count Write-Host "there are $bigFilesCount in $folderPath "变量也可以用于 cmdlet 的参数中
-
学习了变量,学习了方法,再学习流程控制语句(循环),基本上就可以开始编程了,学习一门新的语言掌握这些基本的语法就可以入门
lesson6 流程控制
Taking Control with PowerShell Logic(PowerShell 逻辑?难道是流程控制?是的,就是流程控制)
-
conditional statements 条件语句,
-
if 语句,例子:
1 2 3 4 5 6 7 8 9 10 11 12 13 14 15 16 17 18$abc = Read-Host "please input the path" $bool = Test-Path $abc if ($bool -eq $true) { Write-Host "$abc is real" }elseif ($bool -eq $false ) { Write-Host "$abc is not real !!!" }else { Write-Host 'no one will come here' } #cmdlet返回的结果长度为0,在逻辑判断中是false if (-not(Get-Module -Name tem)) { Write-Host "das" } # @()是空数组 if (-not(@())) { Write-Host "sdsd" }运行:选中所有代码+F8,会把语句也打印出来,然后再打印结果。
-
switch 语句,例子,注意,PowerShell 中的 switch 不需要 break,这是和 Java 不一样的地方。
1 2 3 4 5 6 7 8 9 10[Int32]$abc = Read-Host "please input the num" switch ($abc) { 1 { Write-Host 'you enter the num one' } 2 { Write-Host 'you enter the num two' } 3 { Write-Host 'you enter the num three' } 4 { Write-Host 'you enter the num four' } 5 { Write-Host 'you enter the num five' } 6 { Write-Host 'you enter the num six' } Default { Write-Host 'i dont know what you enter' } }
-
-
loops,循环语句,跟 Java 都很像
-
for 循环
1 2 3 4 5 6 7 8 9 10 11 12 13 14 15 16 17# 简单循环 [int]$loopNum = Read-Host 'please input the num' for ($i = 0; $i -lt $loopNum; $i++) { Write-Host $i -ForegroundColor ($i+2) } # 反转用户输入的字符串 $reverStr = '' $loopStr = Read-Host 'please input the str' for ($i = $loopStr.Length-1; $i -ge 0; $i--) { $reverStr +=$loopStr[$i] } Write-Host $reverStr # PowerShell中好像不会有下标越界的问题,以下代码不会报错,$Error中没有错误信息 $abc = '123456' $abc[20] -
foreach 循环
1 2 3 4 5 6 7 8 9$fileNames = '' $path = Read-Host 'please input the path' $allFile = Get-ChildItem -Path $path -Recurse foreach ($file in $allFile) { $fileNames += $file.NameString Write-Host $file.NameString } # 想要查看变量值,不需要 Write-Host,直接输入变量名就可以,控制台会自动输出变量值 $fileNames -
while 循环
-
do-while
!的作用和在 Java 中的一样1 2 3 4 5 6 7 8$isPath = $false; do { $path = Read-Host "please input the path " $isPath = Test-Path $path if ($isPath) { Write-Host "$path is real path" } } while (!$isPath) -
while
1 2 3 4 5 6 7 8 9# 和do-while功能一样 $isPath = $false; while (!$isPath) { $path = Read-Host "please input the path " $isPath = Test-Path $path if ($isPath) { Write-Host "$path is real path" } }
-
-
-
native cmdlet that perform conditional logic
-
Where-Object,可以用在 pipeline 中Get-Process|Where-Object{$_.WorkingSet -gt 50MB}|Sort-Object CPU,Where-Object 的功能可以用 for 循环语句实现 -
ForEach-Object1 2 3 4 5$path = 'F:\MyLearnning\Introspection' Get-ChildItem -Path $path -Recurse|ForEach-Object -Process {if ($_.PSIsContainer) { # PSIsContainer 这个属性在 cmdlet 智能补全提示中没有提示,但是在 foreach 语句中有提示,用于判断当前路径是不是文件夹 $_.BaseName }}ForEach-Object最灵活的是-Process 参数,可以接受 Script Block,也就是说,可以在{}中写任何逻辑,非常牛逼,非常灵活。
-
-
综合例子
1 2 3 4 5 6 7 8 9 10 11 12$path = 'F:\MyLearnning\Introspection' $folderCount = 0 [Int32]$fileLength = 0 $files = Get-ChildItem -Path $path -Recurse foreach ($file in $files) { if ($file.PSIsContainer) { $folderCount ++ }else { $fileLength += $file.Length } } Write-Host "$path 路径下有 $folderCount 个文件夹,文件总大小为 $fileLength KB"
其中多个逻辑条件,与或非:像比较符,-gt表示>,-ge表示>=,-lt表示<,-le表示<=,关系运算符:-not表示!,-and表示&&,-or表示||,n开头表示 not
lesson7 I/O
PowerShell Input & Output 也就是 I/O
之前介绍变量的时候实际上也是一种输入,一种静态的输入,现在我们可以尝试多种输入方式,ConvertFrom 和 ConvertTo 类的 cmdlet 非常好用,要常用。
-
input
-
url(其实就是 Invoke-WebRequest),牛逼,powershell 可以直接访问 url,真的是太方便了,Invoke-WebRequest 有点儿像 Linux 中的
curl。1 2 3 4 5$webRequest = Invoke-WebRequest -Uri 'https://www.reddit.com/r/powershell.json' $webContent = $webRequest.content $obj = $webContent|ConvertFrom-Json $posts = $obj.data.children.data |Select-Object title,score |Sort-Object score -Descending $postsInvoke-WebRequest 方法返回的值的类型为
Microsoft.PowerShell.Commands.BasicHtmlWebResponseObject,主要的返回内容都在 content 属性中,有了这个 cmdlet,就可以在 PowerShell 中测试 URL 接口了。将 content 经过 ConvertFrom-Json 处理之后返回的是
System.Management.Automation.PSCustomObject类型的数据,注意 ConvertFrom 有多个 cmdlet,方便转化多种输入源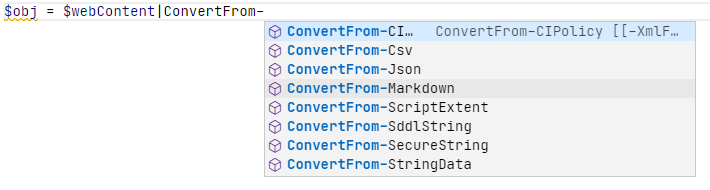
注意,表达式中,
$obj.data.children是一个数组,数组中每个对象都有一个data属性,$obj.data.children.data会直接获取数组所有成员的data属性,$obj.data.children.data的变量类型为System.Management.Automation.PSCustomObject,这是跟Java情况不一样的地方。ConvertFrom-*中常用功能:
-
ConvertFrom-String:Extracts and parses structured properties from string content.将字符串转化为结构化的属性,可以将字符串转化为对象等各种各样的数据结构,具体由模板指定,模板是有固定格式的:
{[optional-typecast]<name>:<example-value>},这个格式用于匹配单个的属性,其中,模板中有的属性名称后面跟着一个*,官方文档的解释是If a property, such as the Name property and its associated other properties, appears multiple times, you can add an asterisk (
*) to indicate that this results in multiple records. This avoids extracting multiple properties into a single record.这一段说的含糊其辞的,我的理解是
*标注的是一个记录的第一个属性,只用标注一次即可,避免一个记录出现重复属性1 2 3 4 5 6 7 8 9 10 11 12 13 14 15 16 17 18 19 20 21 22 23 24 25 26 27 28 29 30 31 32 33 34 35 36 37 38 39 40 41 42 43 44 45# 将host信息转化为对象,ConvertFrom-String会根据默认分隔符(默认是空格,可以通过参数自定义)切分字符串然后给一个默认的属性名称,当然你也可以自定义属性名称 $content = Get-Content C:\Windows\System32\drivers\etc\hosts $content = $content -match "^[^#]" $content | ConvertFrom-String -PropertyNames IP, Server IP Server -- ------ 192.168.7.10 W2012R2 192.168.7.20 W2016 192.168.7.101 WIN8 192.168.7.102 WIN10 # 通过模板转化字符串,注意,模板中一定要包含所有的格式情况,不然会无法转化,而且template至少要包含两个记录的模板才能识别出多条记录 $template = @' {Name*:Phoebe Cat}, {phone:425-123-6789}, {age:6} {Name*:Lucky Shot}, {phone:(206) 987-4321}, {age:12} '@ # 抽象一点的模板 <# $template = @' {Name*:1 1}, {phone:1-1-1}, {age:1} {Name*:1 1}, {phone:(1) 1-1}, {age:2} '@ #> # 模板是分隔符的模板,其提供的仅仅是分隔符之间的关系,比如名字之间的空格,属性之间的逗号,电话号码的格式,带不带括号,只要整个关系匹配到了,分隔符以外的东西不需要跟实际数据一样 # 整个转化过程就像是先通过模板正则匹配数据,然后再将匹配到的数据,按照模板的格式,组装成需要的结构 $testText = @' Phoebe Cat, 425-123-6789, 6 Lucky Shot, (206) 987-4321, 12 Elephant Wise, 425-888-7766, 87 Wild Shrimp, (111) 222-3333, 1 '@ $PersonalData = $testText | ConvertFrom-String -TemplateContent $template Write-output ("Pet items found: " + ($PersonalData.Count)) $PersonalData Pet items found: 4 Name phone age ---- ----- --- Phoebe Cat 425-123-6789 6 Lucky Shot (206) 987-4321 12 Elephant Wise 425-888-7766 87 Wild Shrimp (111) 222-3333 1 -
ConvertFrom-StringData:Converts a string containing one or more key and value pairs to a hash table.将字符串转变为hash table,跟
ConvertFrom-String功能相似,不过没有其强大,就是转化为hash table而已1 2 3 4 5 6 7 8 9 10 11 12 13# 常规用法 $Here = @' Msg1 = The string parameter is required. Msg2 = Credentials are required for this command. Msg3 = The specified variable does not exist. '@ ConvertFrom-StringData -StringData $Here Name Value ---- ----- Msg3 The specified variable does not exist. Msg2 Credentials are required for this command. Msg1 The string parameter is required.
-
-
-
Read-Host cmdlet,这个命令之前用过很多次了
1 2 3$first = Read-Host "please input the num" # 注意-First 参数,意思是只取前面几条 Get-Process|Select-Object -First $first -
Get-Content cmdlet,获取文件内容,实际上是一行一行地读取文件到一个对象中,然后把这些对象存到一个集合里面,Get-Content 配合 Select-String(Finds text in strings and files)使用很香,Select-String 和 bash 中的 grep 很像,会返回匹配-Pattern 的一整行数据
1 2 3 4 5 6 7 8 9 10 11 12# 获取内容 $content 是一个数组,$content[0]获取第一行 $content = Get-Content C:\Users\LiangKang\Desktop\test.txt # 对文件内容进行查询 $plaintext = $content|Select-String -Pattern "11111111" # 可以用正则表达式 $nums = $content|Select-String -Pattern "^\d+$" $characters = $content|Select-String -Pattern "^[a-z]+$" $ips = $content|Select-String -Pattern "^((2(5[0-5]|[0-4]\d))|[0-1]?\d{1,2})(\.((2(5[0-5]|[0-4]\d))|[0-1]?\d{1,2})){3}$" $plaintext $nums $characters $ips注意-Raw 参数,-Raw 的意思是 Ignores newline characters and returns the entire contents of a file in one string with the newlines preserved,带上这个参数,Get-Content 返回的就不是一行一行数据组成的数组了,而是一个大字符串,这样的话,Select-String 就没法用了,要注意。
Get-Content 可以获取多种格式的文件,比如 CSV,配合 ConvertFrom 的多个 cmdlet 转化成 PowerShell 变量,方便操作。
-
output
-
Write-Host 之前也用得比较多了,注意 Write-Host 在输出对象的时候,不会显示对象的内容,而只会显示对象的名称,这跟 Java 是一样的
1 2 3 4 5$info =Get-Host Write-Host $info # 输出 # System.Management.Automation.Internal.Host.InternalHost # 而不是输出 Get-Host 中的信息Write-Host 可以定义输出的颜色,之前我们都试验过了,这里就不试了。
不要在生产环境中使用 Write-Host,PowerShell 的开发者不建议使用 Write-Host ,而是建议使用 Write-Verbose,官方文档 摘录。

一般情况下,想要输出cmdlet或者PowerShell Function中的信息,或者
Write-Verbose本身,带上-Verbose参数即可,如果懒得带,也可以直接修改$VerbosePreference参数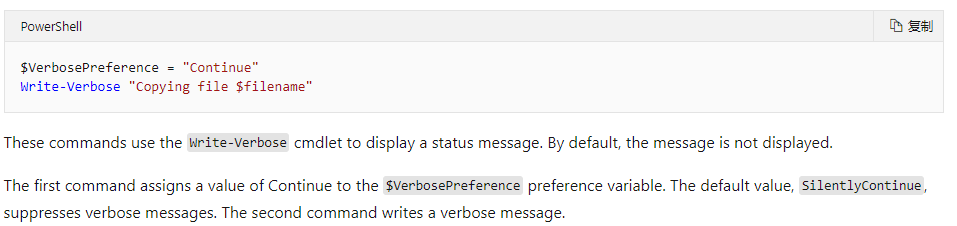
-
Write-Output 是输入 cmdlet、变量之后按 F8 将结果打印到 console 的默认方法
$info和Write-Output $info是一个意思 -
Out-File 顾名思义,输出到文件,如果文件不存在,会自动创建文件,默认是覆盖,想要追加添加-Append 参数,跟 Java 也有点儿像
1 2 3 4# -Path 参数可以省略 Get-Process|Out-File -Path C:\Users\LiangKang\Desktop\process.txt # 用 ConvertTo cmdlet 转化为别的格式再输出 Get-Process|ConvertTo-Csv -NoTypeInformation|Out-File C:\Users\LiangKang\Desktop\process.csv小技巧:在 PowerShell 中 code ‘path’就是用 VSCode 打开指定文件,牛逼
-
lesson8 异常处理
PowerShell Errors and Exceptions Handling,错误和异常处理
PowerShell 有两个 Pipeline,success pipeline, or the success stream 和 error pipeline, or the error stream
-
大量主流的错误都是非终止的(non-terminating),也就是说错误和异常不会让 PowerShell 崩溃或者中断,报错语句后面的语句可以继续执行,比如
1/0;Write-Host 'i am still executed',控制台依然会输出"i am still executed",这是一个非常重要和实用的特性。1 2 3 4 5 6 7$collection = @('C:\Users\LiangKang\Desktop','C:\Users\NotExit','C:\Users\LiangKang\Downloads') # $collection 是一个数组,变量类型为 System.String,这个和 Java 不一样,很奇怪,以后再了解 @() 表示数组 # $collection|Get-Member foreach ($item in $collection) { # 不会在第二个元素停止,第三个元素依然会输出 Get-Item $item }当然你也可以让 PowerShell 在代码报错之后立即停止运行,所有 cmdlet 都有一个默认参数
-ErrorAction(默认值是 Continue,也就是 non-terminating),因此你可以在你希望报错就停止的 cmdlet 中添加-ErrorAction Stop,比如Get-Item 'C:\Users\LiangKang\Desktop\notExist.txt' -ErrorAction Stop;Write-Host "i am still executed"-
Get-Item,和
Get-ChildItem不同,Get-Item获取的是路径指定的内容(结果长度为 1),而不是指定路径下面或者说里面的内容(结果长度为 1 或多个)# 当前路径是桌面文件夹 Get-Item -Path . # 返回桌面文件夹 Get-ChildItem -Path . # 返回桌面文件夹下面的文件夹
小技巧:同一行中的用分号隔开的的语句会在解释器执行此行的时候分别执行。 小技巧:clear 或者 cls 清空控制台
其实还有一个与之对应的概念
–ErrorVariable,默认情况下错误都会汇总到$Error变量中,但是你可以通过这个参数自定义错误的记录变量,不影响$Error的记录。1 2 3 4 5Get-Content C:\Users\LiangKang\Desktop\abd.txt -ErrorVariable 'errorVar' # 此变量中记录了刚刚报的错 $errorVar # 此变量同样也记录了错误,对这个变量的解释请看此课后半段 $Error -
-
什么时候你会想让程序在报错的时候停止呢?当我想捕捉异常然后进行额外操作的时候,也就是用
try {} catch {}的时候,try-catch 可以让你在代码报错的时候做一些额外的操作。这和 Java 很像。 注意,对于一些非 cmdlet 内部的错误,比如逻辑错误,语法错误,算法错误,数学错误(1/0 之类的),try {} catch {}会在try{}中的代码报错的时候,自动停止 PowerShell 的运行,然后执行catch{}中的逻辑。但是对于 cmdlet 内部错误,比如 Get-Item 路径无效之内的错误,情况不一样,PowerShell 无法像处理非 cmdlet 内部错误的时候一样自动停止然后执行 catch 代码块,而是会当 Try-Catch 不存在,将错误抛出,然后继续执行后面的语句。想要实现对 cmdlet 中错误的捕捉,依然只能在 cmd 中添加-ErrorAction Stop1 2 3 4 5 6 7 8 9 10 11 12 13 14 15 16 17 18 19 20 21 22 23 24 25# 非 cmdlet 内部错误捕捉 try { 1/0;Write-Host 'i am still executed' } catch { # 当有 throw 语句的时候,Write-Host 得放到 throw 前面,不然不会执行,只要 throw,PowerShell 就停止运行 Write-Host 'catch error' # $_为当前 Pipeline 中的信息,刚好,现在管道中的是报错信息 Write-Error $_ # throw } # cmdlet 内部错误捕捉 # 输出 not go to catch block try { Get-Item -Path C:\Users\LiangKang\Desktop\notExist.txt ;Write-Host 'not go to catch block' } catch { Write-Host 'catch error' } # 输出 catch error try { Get-Item -Path C:\Users\LiangKang\Desktop\notExist.txt -ErrorAction Stop;Write-Host 'not go to catch block' } catch { Write-Host 'catch error' }这里有一个问题,就是自定义报错之后的行为和报错不中断执行是无法同时实现的,因为
-ErrorAction Stop只能配置一次,所以 try-catch 语句不能瞎写,一定要有足够的需求我们才会去使用 try-catch -
try-catch-finally,finally 代码块,无论是否报错,是否执行 catch 代码块,最终都会执行 finally
1 2 3 4 5 6 7 8 9try { Get-Item -Path C:\Users\LiangKang\Desktop\notExist.txt -ErrorAction Stop;Write-Host 'not go to catch block' } catch { Write-Host 'catch error' throw }finally{ # 即使 catch 代码块中 throw 了,依然会执行 finally 代码块 Write-Host 'run finally' } -
综合例子
1 2 3 4 5 6 7 8 9 10 11 12 13 14 15# 用来测试 URL 链接,真是一个很棒的使用场景 try { $webResult = Invoke-WebRequest -Uri "https://www.baidu.com/notexit.html" -ErrorAction Stop } catch { # 类型为 System.Management.Automation.ErrorRecord,不同的 PowerShell 版本,返回的错误对象不一样, # 在 PowerShell7 中,这个对象的内容不算丰富,通过`$theError|Format-List * -Force`可以查看对象的所有属性,其中 Exception 属性属于错误类型信息,很好用 $theError = $_ # 读取错误类型,进行进一步的逻辑操作,在 PowerShell7 中,好像没有专门的属性直接获取错误状态码,不知道是不是跟我读取的网页有关。 if ($theError.Exception -like '*404*') { Write-Error 'page not found' }else{ Write-Error $theError } } -
$ErrorPowerShell 内部变量,类型 System.Management.Automation.ErrorRecord,其实就是个数组,可以通过$Error[0]访问成员,包含当前 session 中所有的错误变量,新的错误排在前面,这个变量有点儿像 Java 里的数组,而不是集合,$Error.Clear()清空此数组 -
超级例子太简单,没必要记录。
-
-ErrorActio这么重要,其实可以做成一个变量1 2 3 4 5 6 7 8# 这个参数其实可以做一个变量 $para = 'Continue' # $para = 'Stop' try { Get-Item -Path C:\Users\LiangKang\Desktop\notExist.txt -ErrorAction $para;Write-Host 'not go to catch block' } catch { Write-Host 'catch error' } -
可直接在程序运行过程中
throw,相当于自定义报错,终止程序运行,如果在 try-catch 中的 try 代码块中手动 throw,这个错误也会被捕捉到,直接调到 catch。1 2 3if (1 -eq 1) { throw }
lesson9(批量)远程
PowerShell Remoting 远程,利用 PowerShell 管理远程服务器,这是 PowerShell 的非常强力的工具之一,能极大的提升工作效率,这一章会讲很多 PowerShell 以外的基础的系统知识:
-
网络链接(networking connection)
-
network protocols
-
firewalls,
-
routers
-
general server management
-
-
认证(authentication)
-
authentication protocols
-
Kerberos
-
NTLM
-
basic authentication
-
negotiation
-
CredSSP
-
-
可能的连接场景:
每一种场景都需要不同的配置(区别不大),课程的演示环境为 Hyper-V 虚拟机
这一章有点儿难,不要被劝退
-
WinRM : winrm is the protocol that PowerShell uses for establishing remote connections inside of Windows
-
安装 WinRM 的教程:注意,winrm 的所有的命令行语句都应该以管理员的身份运行,另外保证当前网络不是 Public 网络,因为 Public 网络中多个设备之间的链接会有安全风险,必须要改成私有的,参考博客,然后直接运行
winrm quickconfig进行默认配置即可,配置完之后可以运行Test-WSMan验证一下是否安装成功。其中,修改网络类型的语句是Set-NetConnectionProfile -NetworkCategory Private,其中参数 NetworkCategory 的意思如下,来源,官方文档。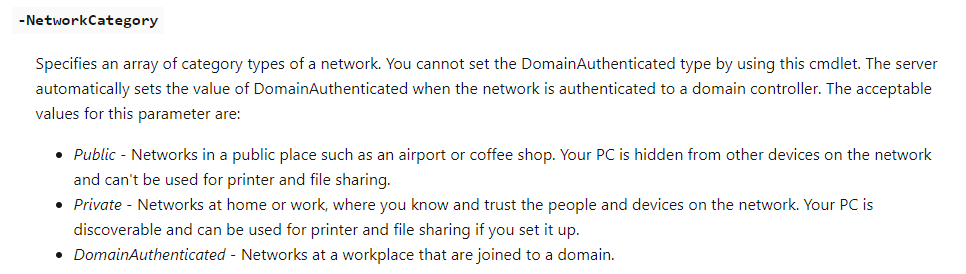
有个问题,手机怎么切换?我感觉手机和PC是不一样的,TODO
-
WinRM 需要进行配置来监听 winrm calls(这就是
winrm quickconfig做的工作),winrm 分 client(用于建立 outbound calls)和 service(用于监听 inbound calls),client 和 service 都需要进行配置。还有一个 listener,用于监听 winrm connections,不同的连接场景需要不同的配置。1 2 3 4 5 6# check winrm settings winrm get winrm/config/client winrm get winrm/config/service # 默认配置中,client 和 service 的 http/https 端口相同 # 这个命令需要管理员权限 winrm enumerate winrm/config/listener
-
-
Windows Remote Access
-
Windows to Windows,同 Domain(wondows domain 相关知识),我手上没有同 Domain 的电脑。而且这个场景在实际的工作和生活中其实不常见,所以这一段教程其实没啥参考性。
1 2 3 4 5 6 7 8 9 10# 当前计算机的名称 $env:COMPUTERNAME # 当前计算机所在域的名称 $env:USERDOMAIN # 查看 TCP 连接的状态 Get-NetTCPConnection -LocalPort 5985 # 查看一个特定的连接(connection)的诊断性信息,比如看别的机器的端口是否开放(能否 ping 通) Test-NetConnection -Computername 192.168.1.3 -Port 5236 #返回当前计算机名 HOSTNAME1 2 3 4 5 6 7 8 9 10 11 12 13 14 15 16 17 18 19 20 21 22 23 24 25 26 27 28 29 30 31 32 33 34 35 36 37 38 39 40 41 42 43 44 45 46 47 48 49 50 51 52 53 54 55 56 57 58 59 60 61 62 63 64 65 66 67 68 69#verify that WinRM is setup and responding on a remote device #you must specify the authentication type when testing a remote device. #if you are unsure about the authentication, set it to Negotiate $credential = Get-Credential Test-WSMan RemoteDeviceName -Authentication Negotiate -Credential $credential #verify local device is listening on WinRM port Get-NetTCPConnection -LocalPort 5985 #verify a remote device is listening on WinRM port Test-NetConnection -Computername 192.168.34.13 -Port 5985 #establish an interactive remote session $credential = Get-Credential Enter-PSSession -ComputerName RemoteDeviceName -Credential $credential #basic session opened to remote device $session = New-PSSession -ComputerName RemoteDeviceName -Credential domain\user #session opened to device over SSL $credential = Get-Credential $sessionHTTPS = New-PSSession -ComputerName RemoteDeviceName -Credential $credential -UseSSL #establish sessions to multiple devices $credential = Get-Credential $multiSession = New-PSSession -ComputerName RemoteDeviceName1,RemoteDeviceName2, RemoteDeviceName3 -Credential $credential #establish session to an entire list of devices $devices = Get-Content -Path C:\listOfServers.txt $credential = Get-Credential $multiSession = New-PSSession -ComputerName $devices -Credential $credential #session opened with advanced session options configured $sessionOptions = New-PSSessionOption -SkipCNCheck -SkipCACheck -SkipRevocationCheck $advancedSession = New-PSSession -ComputerName 10.0.3.27 -Credential user -UseSSL -SessionOption $so #endRegion #region Invoke-Command examples #get the number of CPUs for each remote device Invoke-Command -Session $sessions -ScriptBlock {(Get-CimInstance Win32_ComputerSystem).NumberOfLogicalProcessors} #get the amount of RAM for each remote device Invoke-Command -Session $sessions -ScriptBlock {Get-CimInstance Win32_OperatingSystem | Measure-Object -Property TotalVisibleMemorySize -Sum | ForEach-Object {[Math]::Round($_.sum/1024/1024)}} #get the amount of free space on the C: drive for each remote device Invoke-Command -Session $sessions -ScriptBlock { $driveData = Get-PSDrive C | Select-Object Used,Free $total = $driveData.Used + $driveData.Free $calc = [Math]::Round($driveData.Free / $total,2) $perFree = $calc * 100 return $perFree } #get the number of CPUs for each remote device Invoke-Command -Session $sessions -ScriptBlock {(Get-CimInstance Win32_ComputerSystem).NumberOfLogicalProcessors} #get the amount of RAM for each remote device Invoke-Command -Session $sessions -ScriptBlock {Get-CimInstance Win32_OperatingSystem | Measure-Object -Property TotalVisibleMemorySize -Sum | ForEach-Object {[Math]::Round($_.sum/1024/1024)}} #get the amount of free space on the C: drive for each remote device Invoke-Command -Session $sessions -ScriptBlock { $driveData = Get-PSDrive C | Select-Object Used,Free $total = $driveData.Used + $driveData.Free $calc = [Math]::Round($driveData.Free / $total,2) $perFree = $calc * 100 return $perFree }总结起来,过程就是,先把认证(Credential)存起来,然后放到
-Credential参数使用,然后指定-ComputerName进入指定电脑的会话,直接在会话中执行脚本(退出会话的命令:Exit-PSSession),或者是创建会话(可一次创建多个 session,连接多个-ComputerName),然后以 session 为参数调用Invoke-Command,可以直接同时在(多个)session 中运行语句,当让你也可以直接使直接用Invoke-Command配合-ComputerName参数来在指定计算机中运行脚本,总而言之就是有三种形式运行脚本:-
Enter-PSSession -ComputerName RemoteDeviceName -Credential $credential -
Invoke-Command -ComputerName RemoteDeviceName -Credential $credential -ScriptBlock {$env:COMPUTERNAME} -
1 2$multiSession = New-PSSession -ComputerName RemoteDeviceName1,RemoteDeviceName2, RemoteDeviceName3 -Credential $credential Invoke-Command -Session $multiSession -ScriptBlock {$env:COMPUTERNAME}
其中,
$credential = Get-Credential这个凭证跟远程桌面连接功能很像,即都是确定IP之后输入的账号密码,另外要注意,-ComputerName可以是指计算机名称,也可以是IP,具体看官方文档:
另外还需注意,当session有多个的时候,返回的结果的顺序不是确定的,跟其添加到session中的顺序无对应关系,因为
ScriptBlock在多个session中的运行时同时的,返回结果的顺序是谁先返回谁先显示。所以最好在返回的结果中带上computername的信息 -
-
-
Linux to Linux 不用细看
Windows 用 WinRM,Linux 用 SSH,操作过程跟 Windows to Windows 中的教程是一样的。只有几个参数的区别(毕竟从 WinRM 换到了 SSH)
-
Linux to Windows 或者 Windowsto Linux,这一课没介绍,以后会做
-
高级配置技术(重点,开始于 24:19),主要是讲 trusted host 的概念。对于 Domain 以外的设备(这才是生活中的重点场景,最实用的地方,这也是我最需要学习的东西),因为无法信任,首先需要将其添加到 winrm client 设置中的 trusted host 中,同时需要使用 SSL(即 HTTPS)与之连接,注意,
winrm quickconfig创建的默认配置只有一个 listener,即 Http listener,监听 Https 的 listener 需要手动添加,通过 https 连接上之后,剩下的就跟前面一样了,其实本质上和同一 Domain 中的情况的唯一区别给就仅仅是通过 SSL(即 HTTPS)连接。我根据教程试了一下,尝试了很多次,始终无法建立 SSL 连接,先放着吧,我感觉等我计算机网络方面的知识丰富了之后才能解决这个问题,TODO
-
高级例子
-
@()表示数组 -
splatting:是什么概念?就像一个预定义的参数对象,把 cmdlet 后的多个参数先写好,到时候直接用,这样就不要在命令行中写一大串参数了,
1 2 3 4 5 6 7# @{}表示一个 Hash Table $params = @{ Uri = 'httpssss://www.reddit.com/r/powershell.json' ErrorAction = 'Stop' ErrorVariable = 'errorVari' } Invoke-WebRequest @params顺便介绍了一下
–ErrorVariable,自定义错误记录变量,可回顾第 8 课了解。 -
对象!!!
1 2 3 4 5 6 7 8 9 10# 声明类型变量 $adb = [PSCustomObject]@{ Name = '---' AGE = 'sdsdsd' GENDER= 'MALE' } # 设置对象属性 $adb.Name = 'dfasdf' $adb.AGE = 121212 $adb.GENDER = Get-Content C:\Users\LiangKang\Desktop\123.txt -
cmdlet 中的
-ScriptBlock参数中返回的变量可被承接,这个很有意思1 2 3 4 5 6 7 8 9 10$remoteResults = Invoke-Command @invokeSplat -ScriptBlock { #declare a custom object to store result in and return $obj = [PSCustomObject]@{ Name = $env:COMPUTERNAME CPUs = "-------" Memory = "-------" FreeSpace = "-------" } return $obj }
-
-
好吧,我觉得我会学到的东西,这一个课程都没有细讲,就是一笔带过了,这一课其实讲的都很浅,不停地强调这一课只是对 Power Shell 远程能力的介绍。这一课很明显还需要后续配套的很多学习 TODO
-
(课程以外)通过PowerShell Direct,可以直接访问 Hyper-V 虚拟机,教程,注意,满足条件才可以使用此工具,操作过程跟本课程中 Windows to Windows 中的教程是一样的。
其实看了官方文档不难发现,
Enter-PSSession、Invoke-Command和New-PSSession默认就支持-VMName这个参数。1 2 3 4 5 6 7 8 9 10 11 12 13 14# 获取本机上的虚拟机 Get-VM # 获取凭据并存储 $credential = Get-Credential # 开启 PSSession,直接在虚拟机环境下运行 cmdlet Enter-PSSession -VMName Windows10VM -Credential $credential # 退出 PSSession Exit-PSSession # 不进入 PSSession,在外部执行 ScriptBlock Invoke-Command -VMName Windows10VM -Credential $credential -ScriptBlock { Write-Host 'wahaerwe' } # 同样可以创建 session,输入多个 VMName,用逗号隔开可以创建多个 session $sessions = New-PSSession -VMName Windows10VM -Credential $credential # 传入多个 session,运行脚本块,可同时在多个虚拟机中运行,实在是牛逼 Invoke-Command -Session $sessions -ScriptBlock {Get-Process}
lesson10 脚本编写
PowerShell Scripts
这一课的例子和场景很常用,同时很有启发性,
-
# comment:行注释<# comment #>块注释 -
当有一些客户端的需求的时候,去 PpwerShellGallery 看看有没有可以,这个 PpwerShellGallery 真的是很有意思,打开了新世界的大门。在国内,比较实际的需求是发送消息到微信,我研究了一下,powershell 可以给微信发信息,看 Chrome 相关收藏夹。Powershell 也可以发短信,但是要钱,那还是微信吧。
1 2 3 4 5 6 7 8 9# 相关命令 # 查找 Find-Module -Name "*abc*" # 下载 Install-Module abc # 获取,如果结果为空,则说明此 Module 未安装 Get-Module -Name abc # 引入模块,一般 powerShell 会自动引入,不需要手动引入 Import-Module -Name abc -
判断当前系统是 Windows 还是 Linux
1 2 3 4 5if ($PSVersionTable.Platform -like "Win*") { Write-Host "Windows" }elseif ($PSVersionTable.Platform -like "Unix*"){ Write-Host "Linux" } -
PowerShell 中,使用参数来表示符号,像比较符,
-gt表示>,-ge表示>=,-lt表示<,-le表示<=,关系运算符:-not表示!,-and表示&&,-or表示||,n开头表示 not,和前面的逻辑进行组合,i开头表示 is,和前面的逻辑进行组合另外还有一些其他方面的参数,比如
-like可直接在if语句中做匹配1 2 3 4 5 6 7 8 9 10 11if ('12' -like '1*') { Write-Host 'aha' } # System.String 类型参数的相关逻辑判断 $string = 'I am the subject' $string.Contains('the') # Returns $true $string = 'abc' $string.StartsWith('ab') $string.EndsWith('bc') -
New-Item:
The New-Item cmdlet creates a new item and sets its value.,非常好用的命令,主要用来新建文件和文件夹,也可以创建其他类型的东西,主要指定三个参数即可,-Path —Name -ItemType,eg:New-Item -Path "c:\" -Name "logfiles" -ItemType "directory";New-Item -Path . -Name "testfile1.txt" -ItemType "file" -Value "This is a text string.",也可以将-Name参数合并到-Path参数中,例如New-Item -Path .\testfile1.txt -ItemType "file" -Value "This is a text string.",Item 类型见下图: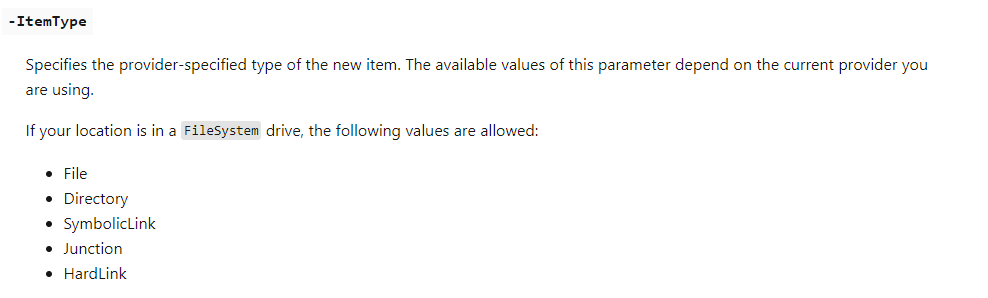
和 Java 一样,如果路径中的文件夹不存在,那就得先创建文件夹再创建文件。
-
Out-Null,隐藏输入,很有意思的功能,注意,课程里提到这个可以用于 task schedule,这个命令可以取消 cmelet 向控制台输出信息,但是依然不能阻止 task schedule 调用 ps1 的时候弹框。
1 2 3$var = 12 # 不会在控制台输出$var 的值 $var | Out-Null和
Out-File是一个系列的方法,类似的还有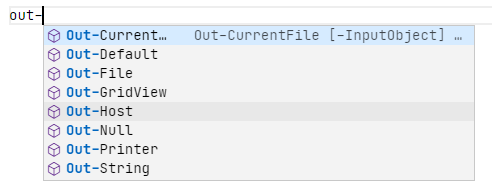
这种同一个动词带不同的名词表示一个系列的 cmdlet 的现象在 PowerShell 中非常普通,非常便于联想、举一反三。比如
|Format-Table,|Format-List -
文件操作示例
1 2 3 4 5 6 7 8 9 10 11 12 13 14 15 16 17 18 19 20# 文件内容操作 增删改查 # 新建文件夹 New-Item -ItemType Directory -Path .\Desktop -Name testFolder # 新建文件,并带有初始内容 New-Item -ItemType File -Path .\Desktop\testFolder -Name test.ps1 -Value '1111' # 获取目录和文件 Get-ChildItem -Path .\Desktop -Recurse # 添加内容 Add-Content -Path .\Desktop\testFolder\test.ps1 -Value '222' # Set-Content 是直接设置文件的内容,如果之前有内容则直接覆盖 # 获取内容 Get-Content -Path .\Desktop\testFolder\test.ps1 # 对文件内容进行查询 Select-String 还可以实用正则表达式,非常方便 $plaintext = $content|Select-String -Pattern "11111111" # 删除文件内容,没有直接的 API,只能曲线实现,根据规则把不符合规则的文件再输出到别的文件中 get-content c:\new\temp_*.txt | select-string -pattern 'H`|159' -notmatch | Out-File c:\new\newfile.txt # 将内容输出到文件中 Get-Process|Out-File -Path C:\Users\LiangKang\Desktop\process.txt # 删除整个文件 Remove-Item 还可以通过通配符(wildcard)一次性删除多个文件 Remove-Item -Path .\1111.docx -
$PSCommandPath,为什么是空的?TODO
-
获取 Windows 操作系统上的硬盘信息:
Get-Volume,可直接通过Get-Volume -DriveLetter C获取 C 盘的信息,其他盘的信息以此类推。1 2 3 4# Get-Volume 返回的结果数组长度为 0 会被 if 判为 false if (-not(Get-Volume -DriveLetter J -ErrorAction SilentlyContinue)) { Write-Host "das" } -
cmdlet 的参数默认都是支持通配符的,感觉默认也是支持正则表达式的 官方文档
-
在 Powershell 中,数学中的除法运算直接用
/就可以了,结果如果有小数,也会保留,这跟 Java 不一样1 2 3 4 5 612/5.1 # 2.35294117647059 12/3 # 4 # 通过类型转换,可以只取得结果的整数部分 [int](12/5.1) # 2 # 不进行类型转换的结果跟转换成 double 类型是一样的 [double](12/5.1) # 2.35294117647059 -
想装一个 VSCode 的命令行插件,这个插件可以很方便地将参数提取出来,这个操作就叫 Splatting,参考第 9 课,但是没有成功。以后有机会再试,TODO
-
param()很好用,运行包含param()的脚本的时候,PowerShell 会强制要求用户输入相关参数值(看是否强制),这比read-host获取用户输入好用,注意,参数名首字母最好大写1 2 3 4 5 6 7 8 9param ( [Parameter(Mandatory = $true)] [int] $Test, [Parameter(Mandatory = $false)] [int] $Name ) Write-Host "参数是 $Test 和 $Name "最妙的是,当一段脚本包含了
param ()的时候,在执行的时候,你选择直接只运行脚本文件,然后等控制台提示你输入参数,也可以在运行脚本文件的时候直接主动带上参数,比如.\abc.ps1 -Test 12131 -Name 4564,秒啊,这样就串起来了,原来 cmdlet 其实也是普通的 PowerShell 脚本,只是有了param (),所以需要通过-ParamName的方式来传值,期待下一节课 PowerShell Functions -
运行脚本首先要通过
Get-ExecutionPolicy查看执行策略,默认是不允许执行 Powershell 脚本的,需要将执行策略设置成 RemoteSigned,Set-ExecutionPolicy -ExecutionPolicy RemoteSigned -
脚本的执行语句也很简单
.\path2file\abc.ps1,就算是在脚本文件所在的目录也需要.\abc.ps1,直接abc.ps1是不行的。 -
这节课就是老师带着我们一起写了一个脚本,细节满满,受益良多,我们应该尽量用脚本来代替日常工作中那些需要很多手动步骤的工作,多用脚本。
lesson 11 方法
PowerShell Functions 方法
-
一个方法的组成部分,帮助信息(function help,不是推荐要写,是一定要写),方法名、CmdletBinding(可不写)、参数(可不写)、方法逻辑(Begin / Process / End,一般都不用这三直接写),返回语句(可不写)
1 2 3 4 5 6 7 8 9 10 11 12 13 14 15 16 17 18 19 20 21 22 23 24 25 26 27 28 29 30 31 32 33 34 35 36 37 38 39 40 41 42 43 44 45# function help - (optional but strongly encouraged) # function name # CmdletBinding - (optional) # parameters - (optional) # function logic (optional Begin / Process / End) # return - (optional) <# .SYNOPSIS Short description .DESCRIPTION Long description .EXAMPLE C:\PS> Example of how to use this cmdlet .EXAMPLE C:\PS> Another example of how to use this cmdlet .PARAMETER InputObject Specifies the object to be processed. You can also pipe the objects to this command. .OUTPUTS Output from this cmdlet (if any) .NOTES General notes .COMPONENT The component this cmdlet belongs to #> function Verb-Noun { [CmdletBinding()] param ( ) begin { } process { } end { } }方法本体可以输入 function,选择 function-advanced,VScode 会自动补全。
-
comment help 帮助信息。
comment help官方文档,方法注释可通过在方法前输入help,然后在提示中选择Comment-Help来自动生成方法注释,这个 help 信息实际上就是我在使用Get-Help命令的时候返回的信息,help 信息中可以输入中文,帮助信息中如果你想提供多个例子,Example 可以写多个,注意,貌似只有.Example可以重复,其他标签的重复会让 help 信息混乱,此外还可以添加其他关键字,比如.PARAMETER,其他关键字可以查看官方文档。 -
方法的方法体直接拿出来也是一个可运行的脚本块,那为什么要用 function 呢,什么时候用 function 呢?脚本是指定任务的一段代码,其实方法也是一样的,这两个没有明显的界限,如果是想快速搞定一个任务,那就直接用脚本,如果是要重复使用一段脚本,或者要让别人来用,那就封装为方法,方法只做一件事,只实现很小的功能,保证功能做好。
运行脚本的方式在第 10 课的时候已经了解过就是
.\path2file\abc.ps1,这种方式可以直接运行脚本块(Script Block),但是无法载入方法,而是要使用. .\path2file\abc.ps1,注意:两个点之间有空格,运行 function 的方法也可以用来运行 Script BlockScript function .\path2file\abc.ps1:heavy_check_mark: :x: . .\path2file\abc.ps1:heavy_check_mark: :heavy_check_mark: -
CmdletBinding,首先,powershell function和cmdlet是有区别的,虽然在使用的时候很像,但是这两个不是一个概念,cmdlet使用C#编写和编译的,但是PowerShell Function 是用 PowerShell 编写和编译的,
[CmdletBinding()]为 Fucntion 添加了一些高级特性,比如Verbose,让 Function 看起来更像 cmdlet,建议所有的 PowerShell Function 都带上。1 2 3# 只添加[CmdletBinding()]会报错,需要带上 param () [CmdletBinding()] param () -
Parameters,parameter 是实现 function 动态输入的一种方法,官方文档。
1 2 3 4 5 6 7 8 9 10 11 12 13 14 15 16 17 18 19 20 21 22 23 24 25 26 27 28 29 30 31 32 33 34 35 36 37 38 39 40 41 42<# .SYNOPSIS 学习 PowerSehll 方法 .DESCRIPTION 返回输入的参数,并对 switch 类型的参数进行取值 .EXAMPLE PS C:\> Learn-Func Explanation of what the example does .INPUTS par0,par1 .OUTPUTS 。。。 .NOTES 。。。 #> function Learn-Func { [CmdletBinding()] param ( #参数 Position 确定在命令中使用参数时,参数名是否是必需的。 如果参数声明包含 Position 参数,则可以省略参数名,并且 PowerShell 将通过命令中未命名的参数值列表中的位置或顺序来标识未命名的参数值。 # position的值从0开始 [Parameter(Position = 0, Mandatory = $false)] [string] $par0, [Parameter(Position = 1, Mandatory = $false)] [validateSet('1', '2')] # 输入的参数值只能是这个集合中的值。另外,validateSet在VSCode的提示为validateSetAttribute [string] $par1 = '1' , # 默认值 [Parameter(Position = 2, Mandatory = $false)] # 其他类型的参数需要带值才能赋值,比如 Learn-Func -par0 123 ,switch类型的参数不需要,只需要出现参数即可 Learn-Func -switch,带上参数就是打开,没带上就是关闭,所以就像一个开关一样。 [switch] $switch ) $par0 $par1 if ($switch) { Write-Host '开关打开' } } -
正常情况下,方法体中除了参数的部分可以随便写,如果你希望方法支持 pipeline 输入,可以在方法体中使用
begin {} process {} end {},同时方法体内不能出现[CmdletBinding()]和[Parameter(Mandatory=$true)],不然会出现参数无法匹配的问题。begin {} process {} end {}这三部分没有必要同时出现,需要那部分就只用那部分。一般用process{}就可以了。当然,这不是处理 Pipeline 数据的唯一方法,你还可以指定参数的
ValueFromPipeline属性,参考 Final Example 中的例子。1 2 3 4 5 6 7 8 9 10 11 12 13 14 15 16 17 18 19 20 21 22 23 24 25 26 27function Get-Function { param ( # Parameter help description [string] $excl ) # 进入方法的时候运行一次 begin { Write-Host "function enter" } # 每次从 pipeline 中获取到值的时候都会运行一次 process { if ($_ -ne $excl) { Write-Host $_ } } # 方法结束的时候运行一次 end { Write-Host "function exit" } } # 调用 1,2,3|Get-Function -excl 2 -
function scope,方法范围,其实很简单,就是方法外没有办法获取方法内的变量,为了获取方法内的变量,通过去掉方法声明直接把方法体当成脚本块(Script Block)来运行以调试,还有一种办法是将想要观察的变量输出到日志中。比如
Write-Debug,这个也算是[CmdletBinding()]引入的 cmdlet 拥有的高级特性。当然,用 VSCode 开发 PowerShell 脚本可直接打断点调试。1 2 3 4 5 6 7 8 9 10 11 12 13function Test-Debu { [CmdletBinding()] param ( ) $date = Get-Date # 输出Debug信息 Write-Debug $date.Year Write-Host "output" } # 测试,不使用 debug 模式 Test-Debu # 测试,使用 debug 模式 Test-Debu -Debug -
Final Example
-
方法之间可以相互引用,这个引用没有顺序要求,比如 A 引用了 B,那么 A 在 B 前面声明也没关系。
引入外部的 ps1 文件,引用方式为
. C:\absolutepath2file\file.ps1引入的脚本的路径必须为从盘符开始的绝对路径,这个语法和. .\path2file\abc.ps1不一样,. .\path2file\abc.ps1无法实现引入外部文件,引入的脚本中如果有对 cmelet 的调用,在引用了这个脚本的外部脚本运行时也是不会调用的,这个引入只会引入 Function 和变量。外部文件,路径为
C:\Users\LiangKang\Desktop\funcbase.ps1:1 2 3 4 5 6 7function Out-Console { [CmdletBinding()] param ( ) Write-Verbose "外部方法" } # 在引入了这个文件的ps1文件执行时候不会输出0000 Write-Verbose "0000"引用了外部文件的ps1文件:
1 2 3 4 5 6 7 8 9 10 11. C:\Users\LiangKang\Desktop\funcbase.ps1 function Test-Function00 { [CmdletBinding()] param ( ) Write-Verbose "111" Out-Console } Test-Function00 -Verbose -
List 数组
1 2 3 4 5 6# List 数组的使用 $result = [System.Collections.ArrayList]@() # Add 方法不限制 add 的元素的类型,方法会返回 list 的长度,所以用 Out-Null 方法消除 # $result.Add("sdsd") $result.Add("sdsd") | Out-Null Write-Host "List Data: $result" -
几个有用 Param 的配置
1 2 3 4 5 6 7 8 9 10 11 12 13 14 15 16 17 18 19 20 21 22function Test-Debu { [CmdletBinding()] param ( # 这两个参数 # ValueFromPipeline # Gets and sets a flag that specifies that this parameter can take values from the incoming pipeline object. When it is not specified, false is assumed. # 这个和begin{}process{}end{}的例子不一样,那个例子里,获取pipeline中的数据用的是$_变量,而这个配置可以直接让参数承接pipeline中的值,eg: 1,2,3|Test-Debu,具体复杂情况下的配置以后再研究 # HelpMessage # Gets and sets a short description for this parameter, suitable for presentation as a tool tip. # 在命令行只输入方法名不带参数的时候,命令行会提示你输入参数,在输入参数的地方输入!?会显示出这个提示信息 [Parameter(ValueFromPipeline = $true, HelpMessage = 'input message', Mandatory = $true)] # ValidatePattern # Validates that each parameter argument matches the RegexPattern # 正则匹配 # [ValidatePattern = ''] [string] $param ) Write-Verbose "$param" } -
Start-Process可以直接开启线程,比如可以直接打开一个网址或者一个文件,系统会调用默认软件打开,Starts one or more processes on the local computer. 特别注意,别名为 start。
-
lesson12 云服务器管理
Manage Cloud,PowerShell 可以管理主流云服务器,比如 Azure, AWS, or Google Cloud.
这一章暂时还用不到,以后再学习吧。
附录
测试脚本