
PowerShell 小技巧
 小虾米
小虾米PowerShell 小技巧
汇总
-
powershell 设置预加载文件:Windows PowerShell 配置文件,在这个文件中,我们可以
设置中文编码(最新版本,可以自定义输出文字,非常方方便PowerShell 7.3.7不用设置中文了,默认支持中文,自己手动设置编码反而会乱码)在 Windows PowerShell 中可以有四个不同的配置文件。配置文件按加载顺序列出。较特定的配置文件优先于较不特定的配置文件(如果它们适用)。
-
%windir%\system32\WindowsPowerShell\v1.0\profile.ps1
此配置文件适用于所有用户和所有 shell。
-
%windir%\system32\WindowsPowerShell\v1.0\ Microsoft.PowerShell_profile.ps1
此配置文件适用于所有用户,但仅适用于 Microsoft.PowerShell shell。
-
%UserProfile%\My Documents\WindowsPowerShell\profile.ps1
此配置文件仅适用于当前用户,但会影响所有 shell。
-
%UserProfile%\My Documents\WindowsPowerShell\Microsoft.PowerShell_profile.ps1
此配置文件仅适用于当前用户和 Microsoft.PowerShell shell。我本机设置的也是这个
-
-
powershell 和 Linux 出厂自带的 bash 一样,包括很好看的 zsh 一样,是同一个概念,都是 shell,只是设计方式不一样,命令不一样,但是 cmd 只是 window 系统下的一个仿 DOS 的应用,Windows 平台未来的发展趋势是使用 Powershell 而不是 cmd
-
在 Windows10 的 Task Schedule 中直接调用 ps1 的时候,不可避免会有弹框,后来换到 bat,发现 bat 其实也有弹框,但是可以通过嵌套 vbs 来隐藏,然后我突然想到,可以在 bat 中调用 ps1,意外发现这样也是不会有弹框的。于是我就用 task 调用 vbs,vbs 调用 bat,bat 调用 ps1,曲线救国来不弹框执行 ps1,那可不可以直接用 vbs 调用 ps1 呢,不行。会提示找不到文件。我发现用 VBS 调用 Bat、Bat 再来调用 PowerShell 脚本隐藏弹框是通用做法。
1
2
3
4
Dim WinScriptHost Set WinScriptHost = CreateObject("WScript.Shell") WinScriptHost.Run Chr(34) & "E:\Mark_Text_Session_Plugin\openBuffer.bat" & Chr(34), 0 Set WinScriptHost = Nothing1pwsh -file E:\Mark_Text_Session_Plugin\open.ps11 2 3 4 5 6Start-Sleep –m 500 foreach($line in Get-Content -Encoding utf8 'E:\Mark_Text_Session_Plugin\DefaultDir\File2Open.md') { if($line -match "^\*\s.+$"){ start ($line -replace '\*\s') } } -
powershell 还没有完全完成本地化,导致有的报错信息的语言和当前 UI Culture 不匹配,所以有的时候报错信息是英文的,有的时候是中文,Github 地址
-
Power Shell 和 Windows 中,culture 和 UIculture 表示不同的意思,https://stackoverflow.com/questions/62909619/powershell-uiculture-vs-windows-setting
-
脚本语言用来做自动化工作有天生的优势,以前我经常用 Java 写 jar 包来做自动化工作,比如读取 word 文档中的关键字之类的,现在跟 PowerShell 一比显得重了很多,PowerShell 是真的轻量,灵活,好用。
-
和 Python 的区别
Python is a general-purpose programming language which can be used for a variety of purposes ranging from administration, web development to even machine learning. Whereas PowerShell is a scripting language and task automation framework aimed to automate administrative tasks programmatically
Python 是一个通用编程语言,和 Java 一样,而 PowerShell 是脚本语言,主要用于任务自动化。
-
1 2 3 4 5 6$wshell = New-Object -ComObject wscript.shell; # 通过窗口标题指定当前选中的窗口 $wshell.AppActivate('title of the application window') Sleep 1 # 模拟敲击 $wshell.SendKeys('~') -
Start-Process默认不返回任何东西,如果想要返回此命令开启的线程,则需要带上-PassThru1 2$proce = Start-Process .\11.txt -PassThru $proce.id -
Wait-Process,等待线程执行完毕,首先保证线程已经在运行了,然后把这个线程的 ID 放到此命令中运行一下,即可进入等待。对于那种需要保证执行顺序的场景非常实用, -
处理 Microsoft 文档
读取 Microsoft Word 文档,变量
$Word、$Document类型均为System.__ComObject1 2 3 4 5 6 7 8 9 10 11 12 13 14 15 16 17 18 19 20 21 22 23 24 25 26 27 28 29 30 31<# .SYNOPSIS read Microsoft Word Field line by line .DESCRIPTION read Microsoft Word Field line by line .EXAMPLE PS C:\> Get-WordText -FilePath C:\path2wordfile.docx .INPUTS Microsoft Word File Path .OUTPUTS Microsoft Word file data .NOTES Only output paragraphs data,tables would not be shown #> function Get-WordText { [CmdletBinding()] param ( # word file path [Parameter(Mandatory = $true)] [String] $FilePath ) $Word = New-Object -ComObject Word.Application $Document = $Word.Documents.Open($FilePath) $Document.Paragraphs | ForEach-Object { $_.Range.Text } # 一定要记得关闭资源,不然对象会一直在内存中,文件也会被锁定 $Document.close() $Word.Quit() }创建Microsoft Word文档,API操作逻辑非常像手动操作,先选中,然后再输入,先按下加粗按钮,再输入,文字就加粗,输入完成之后如果不想加粗了,还得再点击一次加粗按钮取消加粗。按照这个逻辑,只要你在手写的时候能用到的功能,通过
$Word或者$Document对象都可以实现,比如基本的查询、替换特定文字1 2 3 4 5 6 7 8 9 10 11 12 13 14 15 16 17 18 19 20 21 22 23 24 25 26 27 28 29 30 31 32 33# Word.Application is what we will then use to begin interacting with Word. $Word = New-Object -ComObject Word.Application # 如果想要看到编辑过程,就设置为$True,否则就保持默认$False # $Word.Visible = $True $Document = $Word.Documents.Add() $Selection = $Word.Selection $Selection.TypeText("My username is $($Env:USERNAME) and the date is $(Get-Date)") # if I make use of the TypeText method again, the text will appear on the same line as the rest of the text. # If you are looking to start on a new line, then you should look at using the TypeParagraph method and then use TypeText to begin writing on a brand-new line. $Selection.TypeParagraph() $Selection.TypeText("This is on a new line!") $Selection.TypeParagraph() $Selection.TypeParagraph() $Selection.TypeText("Yet another line to type on!") # 添加样式 $Selection.TypeParagraph() $Selection.Font.Bold = 1 $Selection.TypeText("Here is something that I felt should be in Bold") $Selection.Font.Bold = 0 $Selection.TypeParagraph() $Selection.Font.Italic = 1 $Selection.TypeText("Just some fun text that is now in Italics!") # 保存 $Report = "C:\Users\LiangKang\Desktop\111.docx" # 第二个参数也可以不要 $Document.SaveAs([ref]$Report, [ref]$SaveFormat::wdFormatDocument) $Document.close() $word.Quit() # 清空缓存,可做可不做,如果需要重复造作,那就还是要清 $null = [System.Runtime.InteropServices.Marshal]::ReleaseComObject([System.__ComObject]$word) [gc]::Collect() [gc]::WaitForPendingFinalizers() Remove-Variable word追加信息到已存在的Word文档
1 2 3 4 5 6 7 8 9 10 11 12 13 14$Word = New-Object -ComObject Word.Application # 必须保证路径存在 $Document = $Word.Documents.Open('C:\Users\LiangKang\Desktop\1111.docx') $Selection = $Word.Selection $Selection.TypeText('1111111111111111') $Selection.TypeParagraph() $Document.Save() $Document.close() $word.Quit() # 清空缓存,可做可不做,如果需要重复造作,那就还是要清 $null = [System.Runtime.InteropServices.Marshal]::ReleaseComObject([System.__ComObject]$word) [gc]::Collect() [gc]::WaitForPendingFinalizers() Remove-Variable word有了以上两个例子,已经可以实现读取、新建、追加等功能,
操作Microsoft Excel,其实跟操作Word是差不多的,有需要再看,TODO
-
Get-Content的-Tail参数和 Linux 的tail命令不一样,powershell 中的参数只是读取此刻文件的最后的多少行,Linux 中的命令是持续输出文件的最后多少行 -
PowerShell 获取 WiFi 信息,netsh 是一个非常强大的工具,[官方文档](Netsh Command Syntax, Contexts, and Formatting | Microsoft Docs)
1 2 3 4 5 6 7 8 9 10 11# 通过powershell cmdlet获取连接网络基本信息 Get-NetConnectionProfile # Name属性即为当前连接的WIFI的名称 (get-netconnectionProfile).Name # 或者 Get-NetConnectionProfile|Select-Object Name # 使用netsh命令(实际是netsh.exe,也就是Windows中常见的exe文件),这个命令不是powershell cmdlet,cmd也可以使用,注意,这个命令返回得数据的类型是String,所以只能用select-string对结果进行筛选 # SSID 貌似就是WIFI名称 netsh wlan show interfaces | select-string SSID # 直接查看WIFI密码,看关键内容那一行 netsh wlan show profiles name='SSID Value' key=clear -
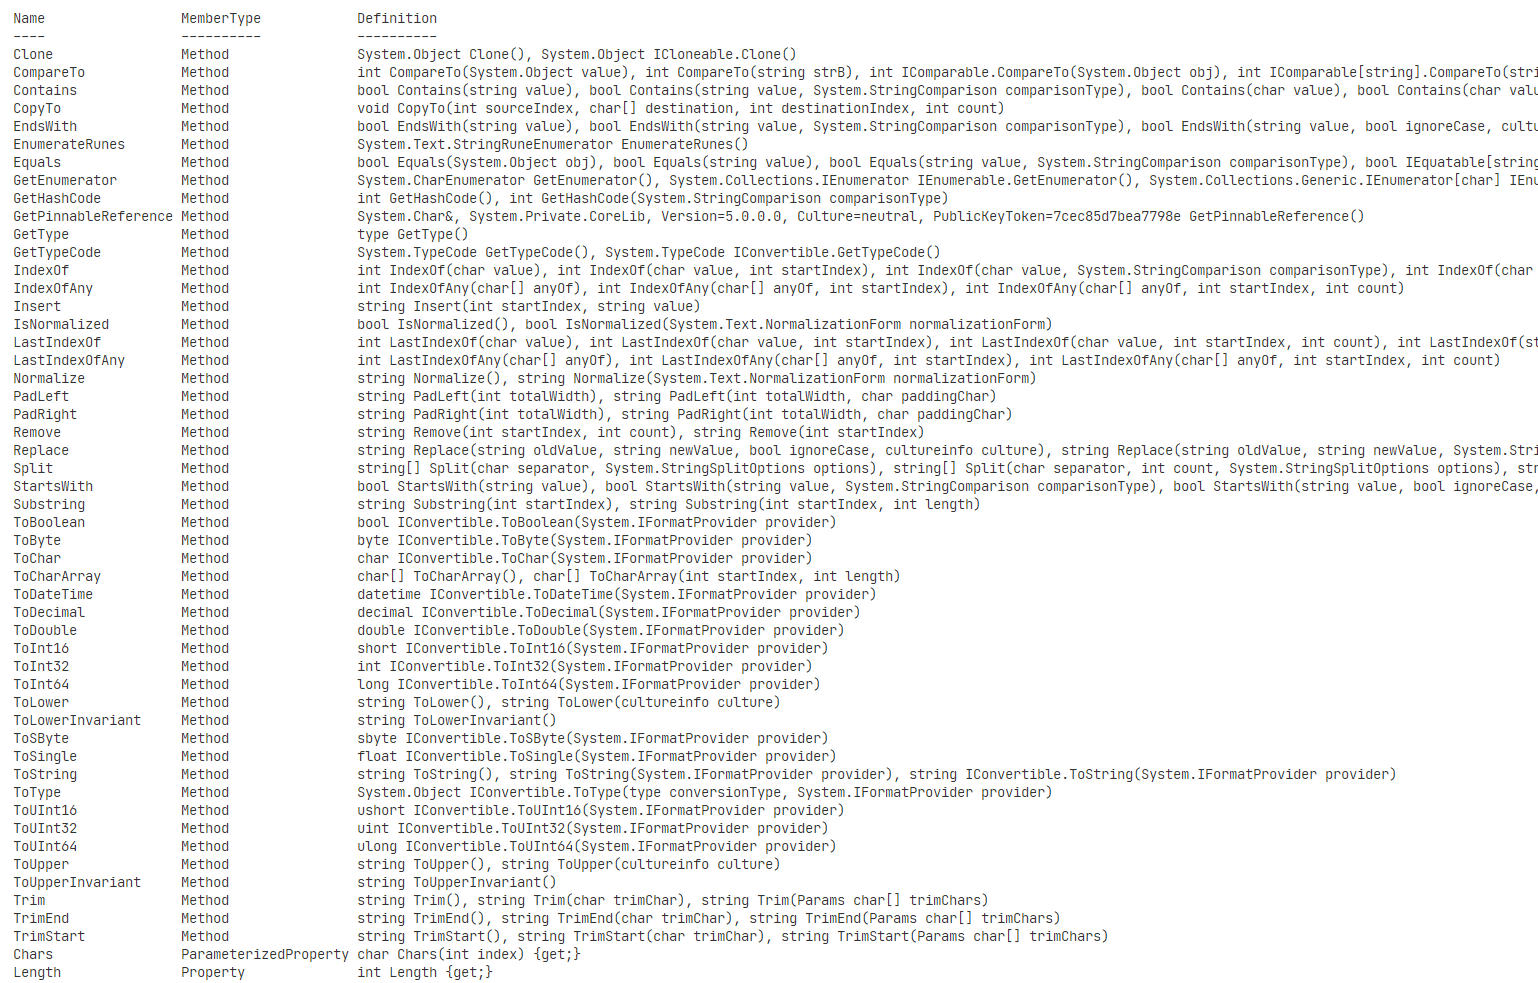
System.String,字符串类型数据的方法,跟 Java String 其实差不多。
-
获取今天是周几
1 2 3 4 5 6 7 8 9 10 11 12 13 14 15 16 17 18 19function Get-WeekDay { [CmdletBinding()] param ( ) $weekDay = "" switch ((get-date).dayofweek.value__) { 0 { $weekDay = '周日' } 1 { $weekDay = '周一' } 2 { $weekDay = '周二' } 3 { $weekDay = '周三' } 4 { $weekDay = '周四' } 5 { $weekDay = '周五' } 6 { $weekDay = '周六' } Default {} } return $weekDay } # 可直接将数字转化为DayOfWeek类型的数据,0为周日,1-6为周一到周六,System.DayOfWeek是一个枚举 $day = [System.DayOfWeek]0 -
在一些场景中,需要通过死循环来实现监听,但是这样的话,当前 session 就会卡死,无法再执行后面的命令,有一个方法可以解决这个问题类似于新开一个线程,我们可以先建立一个 session,在新的 session 中阻塞不妨碍现在的 session 中执行的操作,命令是
New-PSSession,这个跟 Tech Thoughts 的第 9 课中的远程控制的流程一样,建立新的 PSSession,需要有凭据(credential),我没有调通,以后有需要再研究。 -
查看端口占用,关闭进程
1 2 3 4 5 6# 最后一列是进程 ID,就是 PID,假设是 5064 netstat -ano |findstr 5236 # 获取进程信息 Get-Process -Id 5064 # 关闭进程 Stop-Process -Id 5064 -
弹框提示信息
1 2 3 4 5 6 7 8 9 10 11 12 13 14 15 16function Popup-Text { [CmdletBinding()] param ( # Parameter help description [Parameter(Mandatory = $true)] [string] $ShowText, # Parameter help description [Parameter(Mandatory = $true)] [string] $Title ) $wshell = New-Object -ComObject Wscript.Shell $wshell.Popup($ShowText,0,$Title,0x1) } -
常用的看目录结构的命令
-
dir:类似于 Linux 中的 ll,查看当前目录下所有的文件和文件夹的详细信息。
-
tree 用树的形式展现当前目录结构下所有的目录,此命令会递归所有子目录,非常只管,还能复制出来
-
根据日期创建文件,参考日记文件代码
-
监控文件夹下的文件修改并作出相应的行动,看 filewatch.ps1
1 2 3 4 5 6 7 8 9 10 11 12 13 14 15 16 17 18 19 20 21 22 23 24$basicPath = 'D:\OneDrive\Document\MyLearnning\Diary' if (-not (Get-Item -Path $basicPath)) { return } $year = (get-date).Year $mouth = (get-date).Month $day = (get-date).Day $filePath = "$basicPath\$year" if (-not (Get-Item -Path $filePath)) { New-Item -ItemType Directory -Path $filePath } $filePath = "$filePath\$mouth" if (-not (Get-Item -Path $filePath)) { New-Item -ItemType Directory -Path $filePath } $filePath = "$filePath\$day" if (-not (Get-Item -Path $filePath)) { New-Item -ItemType Directory -Path $filePath } $finalFile = "$filePath\text.docx" if (Get-Item -Path $finalFile) { # 文件已存在,再不再操作 return } -
在脚本中设置环境变量:
设置用户级的环境变量:
1[System.Environment]::SetEnvironmentVariable('test_var',"xiashuo.xyz","User")设置系统级的环境变量:注意,在脚本中设置系统级的环境变量,需要管理员权限
右键任务栏 Window 田字图标,选择终端管理员即可
1[System.Environment]::SetEnvironmentVariable('test_var',"xiashuo.xyz","Machine") -
环境变量
$env:HTTP_PROXY,用于设置 Powershell 的网络代理,我们可以在当前窗口运行$env:HTTP_PROXY="http://127.0.0.1:1080"来临时设置代理地址,也可以直接跑到系统设置中直接新建一个名为HTTP_PROXY值为http://127.0.0.1:1080的环境变量来永久设置代理
附录
常用脚本